Caudate Bar

SludgeMunkey

New member
Joined
Nov 11, 2008
Messages
2,299
Reaction score
79
Points
0
Location
Bellevue, Nebraska
Country
United States
Display Name
Johnny O. Farnen
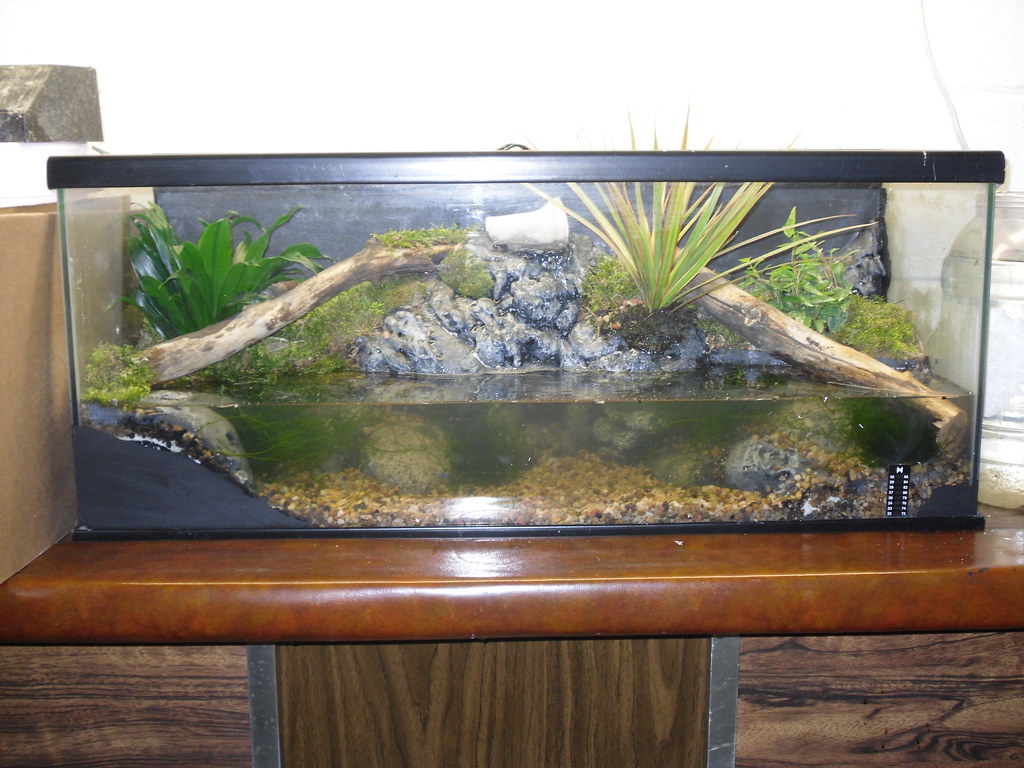
I recently built a 250 gallon custom acrylic vivarium and had intended to post pictures here once the plants had grown in nicely, however a visitor to my home offered to purchase it resulting in an obscene profit for me...

Anyway, out of sheer boredom, I started a new project.

I started with a portable bar I found on the curb last trash day. Yep, that's right, a serve-alcohol-to-your-guests type bar. Then I recycled a 20 gallon long aquarium I had left over from my feeder goldfish breeding experiment some months back. (Which was very successful I might add, it has moved to 4 29 gallon aquariums now...)

Anyway, here is the nightmare tank before I started:
3390016602_7f1aa702b1.jpg

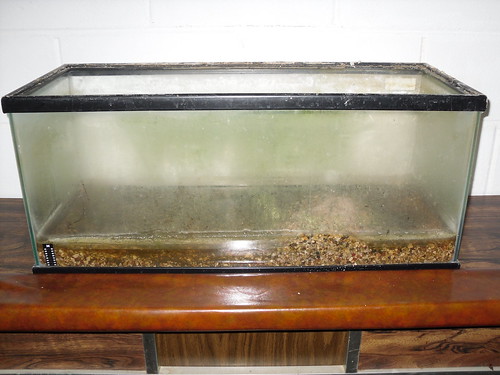
As you can see, its filthy from spending the winter out in my leaky shed. Also notice the tacky bar...soon to be an indoor heaven.


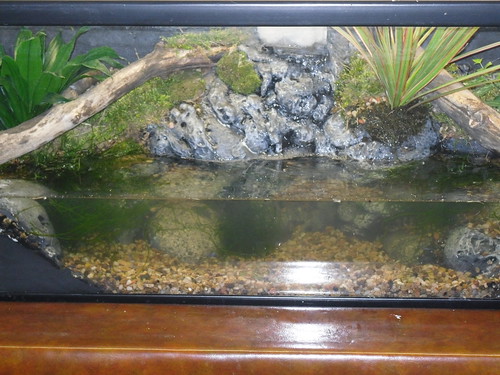
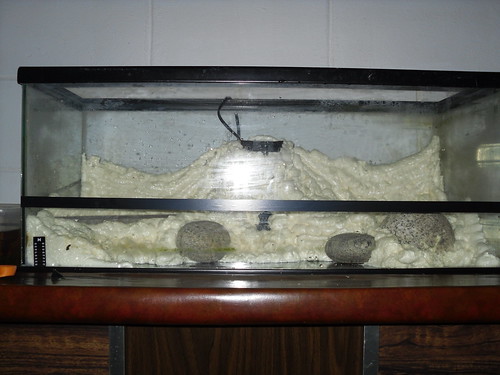
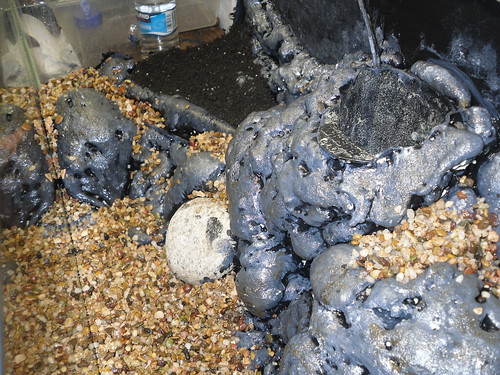
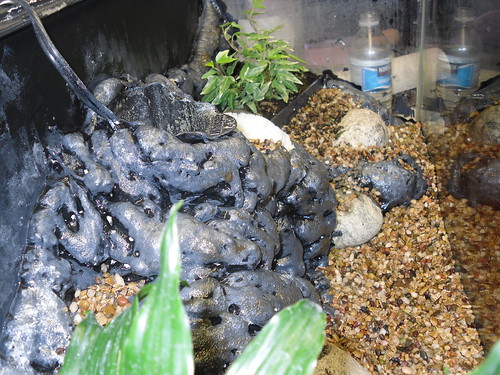
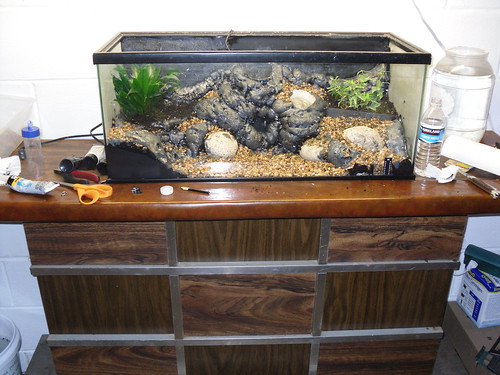
So here it is cleaned up a bit, filter unit and initial foaming in place. There will be much carving, sanding and painting to do. The Black electricians tape is a waterline reference while I work on this project. I skimped a bit on the cleaning right now for reasons I will show later.
3390017682_66b4792213.jpg


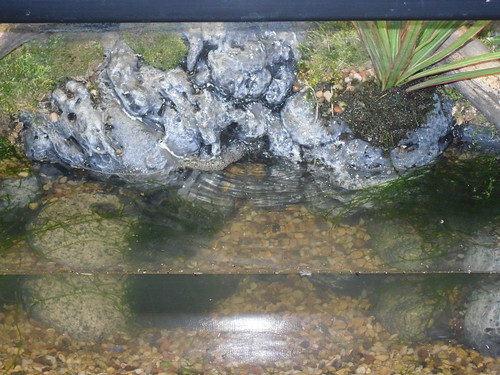
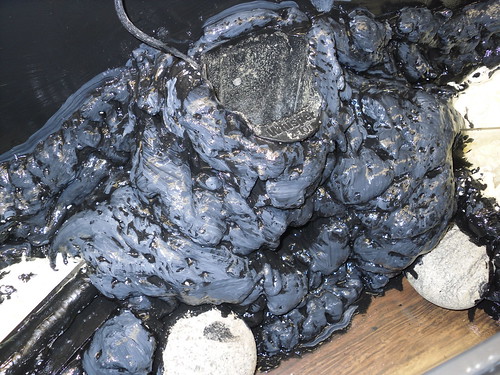
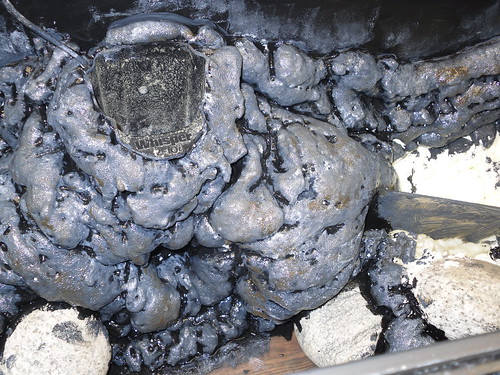
Next is a close up of the waterfall filtration base...it appears Giger's Alien has hatched....
3390018828_174dd39747.jpg

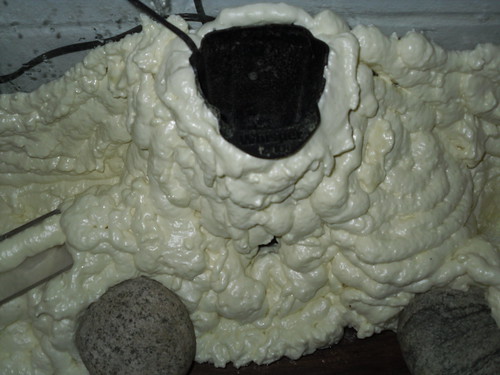
The foam expanded a bit more than planned, so I will have to do a bit of carving to clear the inlet. Thankfully I planned ahead for just such an issue, and coated the inlet area of the filter body with vegetable oil so the foam will release easily from that spot once it is dried and carved. You can also see a bit of the acrylic sheeting reinforcing walls I have hidden in the foam to provide solid mounting spots for stones and wood to be added later. These are basically walls with shelves on them strategically hidden in the foam to support the weight of some stones and mobani wood.
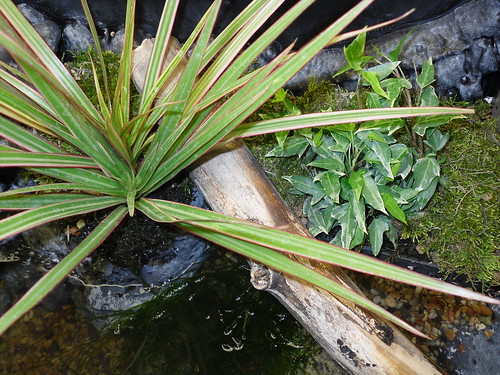
Not visible are bowl shaped areas to facilitated the addition of growing media for live plants.

Updates as the project progresses...
 
Last edited:
UPDATE

Been busy the last couple of hours since I posted the pictures from yesterday.

Here is more pictures of the work in progress.

3389568233_751c686b53.jpg

First coat of paint in progress. remember the dirty film I left on the tank? This is why. It makes clean up of the paint on the glass much easier!
3390387438_8a2d10579f.jpg


The above picture and the next few show additional coats of paint. I use a combination of wet brushing, dry brushing, sponge painting and a sprayer full of bottled water to get interesting "stone" effects.
3390388790_291218c288.jpg


So while waiting for the paint to dry, I cleaned out the Cynops, Axolotl, Triturus, and Amiphuma tanks and recieved the latest Daphnia shipment. Then it was time to get some landscaping done...
3389581521_1358d53c1b.jpg


And just for giggles I planted the first of a few plants. I chose species that do well in my planed usage of this set up. The retailer tag also claimed that all these plants were grown indoors in lower lighting conditions and are supposedly superior for indoor use. The truth of this statement will be determined...
3390400456_92819322f1.jpg


I will add in here that the gravel has been installed with a pourable clear urethane.

Here is a wide shot of the entire project thus far:
3390396108_46d9ba0da9.jpg


Notice an additional hole has been cut in the foam stone for yet another plant. The Bar itself is cleaning up nicely. (And yes, that's a one gallon jar of Daphnia magna on the side there- my critter room is getting crowded:D)

Next: more plants, background finishing, and a lid for this tank.
 
I've got to tell you that if you ever decide to sell these over the Internet, please put me on your list.
 
Wow Johnny, you are talented, creative and smart. Your tank looks fantastic and pricey.

Cheers
 
Thanks for the kind words! I wish I had not mistakenly deleted the 250 gal project pictures. It was all naturall construction, save for the 1/2 lexan sheeting.

Truth is I like to think of myself as a "Low Budget MacGuyver" Actual cost on this project has been very low. The foam, paint, urethane and plants came to a grand total of about 30$ US. I bought the gravel in a bulk 25lb sack for 5 dollars. The yet to be added mobani wood and some interesting river stones were fished out of the discount bin at a big name pet store for ten dollars. The tank was purchased factory direct from a now defunct company locally years ago and the filter was in a huge box marked "Fish Stuff" in my handwriting I found in the garage while searching for the secret Pug dog tennis ball hiding spot. The rest of it is all found, scavenged, or recycled bits from work and my neighbor hood.

The wife was impressed enough I think have have her convinced to let me get a much larger tank to do this with.

This is the first time I have tried the blow foam method, I had never thought of doing this untill carousing the Vivaria posts and pictures on here.
 
Yes but it's about creativity and ingenuity. Neither of which everyone has. So I meant what I said - I'd buy a vivarium from you :p.
 
It looks amazing, I can't wait to see it when it's all done. I don't know if you've said it already ... so sorry if I missed it ... what type of newt to you plan on housing in this tank?

Also what kind of paint did you use? I'm trying to get my husband to help me with a similar project and I rather like the painted effect.
 
I use Liquitex Acrylic Paints from their BASICS brand line. These are relatively inexpensive and are water proof when dry. One note on paints though, avoid using greens and blues. These colors use various copper based pigments which can be hazardous to many animals. I also recommend use of a clear acrylic sealer for areas below the water line., but this is not a must.

The other trick with the paints is to allow a minimum 72 hour drying time before adding any water to the tank. However in this case longer is better.


As for what critters are going to live here, I am not sure yet...probably a few Cynops sp, or maybe some Notos once I get the moss installed and the rest of the plants in.
 
Very nice setup! Can't wait for those plants to grow in.

Please don't take offense - this is a well meant comment - change the gravel. It looks bad, to be honest. It also looks like the same stuff from the first pic. If that was from a feeder goldfish tank I wouldn't use it anyway. Get some more natural substrate!
 
Thanks for the input on the gravel...its actually brand new, not recycled, although it is from the same 25lb bulk bag as the gravel that was in the tank to start (the dirty gravel has been saved for flower pot duty). The actual tank was subjected to an eight hour shift in the UV-C sterilizer at work also. I agree, the color scheme doesn't match with that brown gravel, however it is intended as merely a rough surface to cover over with a layer of thin, sandy soil for various mosses. Think of it as "traction" for rhizomes.

Well, off to plant some moss and install some wood now that the leak/filtration test was successful! More pictures soon.
 
UPDATE! with more pictures

Well, things are moving along nicely...here is some shots thus far:
3398002227_618c2f1a00.jpg

(Please forgive the quality of the pictures, I am having a bit of an off day.)
So here is a shot of the waterfall, still needs a bit of adjusting and a nice moss cover.
The water is a bit foggy here as it had just been added, a bit of soil got stirred up.

3398818260_9f28534b8f.jpg

Here's a close up of the right side of the tank.


3398011611_6cc9ccfb2d.jpg

A wider shot of the tank...as you can see its still a bit rough around the edges, literally. But I will fine tune it quite a bit more as things grow in better and take hold. I am thinking about adding some spongia (pennywort) and possibly some dwarf ferns on land.

And finally, here is the WIDE shot of the project thus far. Still a ton of work to do on the interior, exterior, the cover, and the bar itself. I picture the tank framed by large potted ferns. I am also weighing the option of removing that horrible 1970's chrome and brown p'leather and replacing it with nice lichen covered maple boughs cut to length and planed flat on the non visible side for a rustic looking fit.
3398824208_15ac90f3a3_b.jpg
 
Last edited:
That looks simply amazing, it makes me want to try it on a 5 gallon tall for some frogs.
 
So tell me about moss. I want to know how you get moss to grow and thrive in the tank, or do you? Do you just set it over things in an aesthetically pleasing manner and change it out every now and then? ... The reason why I ask; I bought this weird bagged moss from petsmart a while ago and placed in areas... BUT it never took hold.... and I'm thinking because it's already dead sitting in that bag all dried out...... Where would you suggest i get my moss if I got nothing but petsmart's and co's around me?

Awesome looking tank. people like you and grius inspire me. I've never known that creativity and ingenuity can come out in such a way. I REALLY hope to make a profitably hobby from doing things like this, you guys are my teachers... I am you grasshopper. :D
 
So tell me about moss. I want to know how you get moss to grow and thrive in the tank, or do you? Do you just set it over things in an aesthetically pleasing manner and change it out every now and then? ... The reason why I ask; I bought this weird bagged moss from petsmart a while ago and placed in areas... BUT it never took hold.... and I'm thinking because it's already dead sitting in that bag all dried out...... Where would you suggest i get my moss if I got nothing but petsmart's and co's around me?

You are correct in that the moss in the bag is dead. It may not be a good idea to use as it may cause the water to become acidic. A good moss to place in your aquatic setups would be Java Moss. Very hardy plant which tolerates the cooler temperatures caudates prefer and do not require much light. You might want to put an ad in the wanted section of these forums to see if anyone has any spare that they'd be able to give you or check out aquabid. The selection there knocks the socks off of what Petsmart has. Petsmart likes to stock non-aquatic plants and sell them as aquatic plants, such as Mondo grass. Hope this helps.
 
Yes, most bagged moss is dead...and even worse in addition to that it is often dyed with copper based green dye. I do not recommend it for amphibians at all. The moss in this set up is live, harvested from my own back yard. The secret to getting it to take hold is really kind of crazy, but it works-

First select mosses that grow in partial sunlight, avoid shade mosses. In other words, its best to get it from a field or yard, rather than a log deep in the woods.

Second harvest during dry parts of the year, early spring or late autumn. Mosses go dormant during these times, and spring back to life very quickly when transplanted into a terrarium. It is better to take smaller samples rather than an entire mat. Slow growth means it can take years for the bare spot to regenerate.

Third provide a rough or natural stone surface for it to grow on. I like to use urethane bound gravel with a light dusting of fine sand applied before it dries, then a work a small amount of non fertilized potting soil onto this surface. Then the moss is placed on top. For rocks it is best to actually tie the moss in place with fishing line.

Mosses do not feed through roots, they actually absorb most of their moisture from the air so avoid saturating them to water them, it is best to have them in a high humidity environment to get them to take hold, although a light misting daily works well too. 80% humidity at 65-72F works extremely well. They also grow very slowly. The process of taking hold can take months for some types. Keep it damp

The final secret is buttermilk. I kid you not! For outdoors usage you literally blend the moss up with some buttermilk in a food processor and pour it into where you want it to grow. (moss with spore stalks works best out doors) For indoors use, this can be a stinky option so I cheat and just dust the bottom of the rhizomes (roots....sort of) with a very light coating of powdered buttermilk baking mix. Sounds crazy, I know, but this works very well for me. I use a make-up foundation brush I purchased for just this purpose.

Now a bit about dead moss and pH. It will cause acidity issues. Ever heard of peat bogs? That is wet, rotting sphagnum moss in action. If you use dead moss, it needs to be kept in a dry set up and away from water.


(As for the question about paint, look earlier in the thread, the info was already posted....)
 
Last edited:
Very interesting moss culture information. I have used buttermilk too. This was outside, to encourage moss in my backyard. I diluted it with lots of water, and just watered the area with a watering can. This was based on a newspaper article about landscaping with moss. I also used sulfur to make the soil more acidic. It seems to have worked to some extent, better in the areas that are more moist. In terrariums, my success has been more limited. My best luck was with a setup that had a waterfall. It was a foam construction covered with epoxy and sand that I had made, used, and then left outside for a while. It must have gathered a variety of moss spores outside. When I used it again, this time under pretty good fluorescent lighting, moss started growing on it and eventually covered the parts that had good seepage from the waterfall and also got good light. It was a nice surprise. Outside of that I have had the best luck with it in terrariums that haven't included animals. In my experience it seems to like light, like moisture, dislike heat, dislike a heavy nutrient load, and dislike stagnant air. I have mostly tried the sorts that grow in northern Minnesota, so that may have influenced my results. I would like to try a setup with a mister/fogger sometime. Moss is interesting on it own and is such a nice part of the habitat of many salamanders that I'd really like to know how to do it right.
 
I have heard that beer works well also, however it I can't justify wasting beer...:D
 
Well, it could be that beer works even if it's already been through one consumer, which would be less of a waste. Liquids that have been through my dog, however, don't seem to help!
 
General chit-chat
Help Users
  • No one is chatting at the moment.
  • Shane douglas:
    with axolotls would I basically have to keep buying and buying new axolotls to prevent inbred breeding which costs a lot of money??
    +1
    Unlike
  • Thorninmyside:
    Not necessarily but if you’re wanting to continue to grow your breeding capacity then yes. Breeding axolotls isn’t a cheap hobby nor is it a get rich quick scheme. It costs a lot of money and time and deditcation
    +1
    Unlike
  • stanleyc:
    @Thorninmyside, I Lauren chen
    +1
    Unlike
  • Clareclare:
    Would Chinese fire belly newts be more or less inclined towards an aquatic eft set up versus Japanese . I'm raising them and have abandoned the terrarium at about 5 months old and switched to the aquatic setups you describe. I'm wondering if I could do this as soon as they morph?
    +1
    Unlike
    Clareclare: Would Chinese fire belly newts be more or less inclined towards an aquatic eft set up versus... +1
    Back
    Top