Caudata.org: Newts and Salamanders Portal

Register a free account today to become a member! Once signed in, you'll be able to participate on this site by adding your own topics and posts, as well as connect with other members through your own private inbox!
Did you know that registered users see fewer ads? Register today!

Almost done with the "flooring"!

weofui

New member
Joined
Feb 21, 2012
Messages
75
Reaction score
1
Location
Colorado
I wasn't going to post pictures until I was finished, but it's taking longer than I'd hoped it would... so perhaps posting will spur me on to completion.

Here's the bottom of my axie's intended "forever home":

FullTank.jpg


Just two more smallish sections and I'm done!

Here's a close up of one of the completed sections:

TankCloseUp.jpg


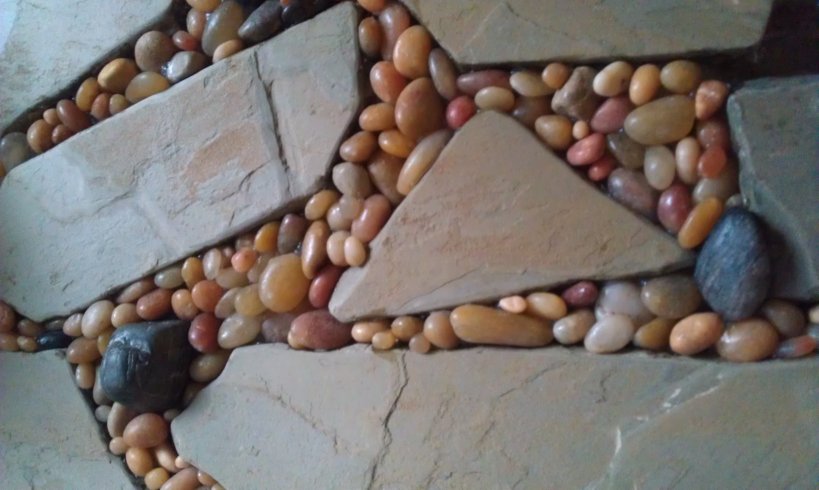
I've been very careful to insure that every single rock is siliconed inextricably to the bottom and that there aren't any unfilled little crevices for waste to collect in. Hopefully Gir and Piggy will like it as much as I do. :)
 

Coldnorthtoy

New member
Joined
Sep 2, 2011
Messages
127
Reaction score
1
Location
BC, Canada
Did you save some of those jelly beans to eat? :p

Looks really cool. :) What are the big, grey, flat rocks made of? Are you attaching everything directly to the glass bottom of the tank?
 

weofui

New member
Joined
Feb 21, 2012
Messages
75
Reaction score
1
Location
Colorado
*laughs* They do look rather like jelly beans in the picture, but their natural color is much more... natural.

The flat stones are broken slabs of slate flooring tile that I picked up at a home improvement store for just over $2 each. I cracked them up with a hammer, scrubbed them thoroughly, and then filed the sharp edges smooth. Everything is attached directly to the glass bottom of the tank with aquarium grade silicone.
 

Camirdra

New member
Joined
Sep 4, 2011
Messages
68
Reaction score
1
Location
WA state
Looks pretty cool! I also thought jellybeans when I saw it lol! I used the slate tile frome Home Depot in my tank also, but as whole pieces... looking at yours I see a redo in my future... :)
 

Martin21114

New member
Joined
Aug 24, 2011
Messages
387
Reaction score
14
Location
Maryland
Love the Axie names. Do you also have a Zim? That was my veiled chameleon's name.
 

weofui

New member
Joined
Feb 21, 2012
Messages
75
Reaction score
1
Location
Colorado
Camirdra - I thought about using the slate tiles whole, but I thought having the pebbles in there as well would give me more opportunity to ground live plants in ways that aren't obvious. I will say that this method takes a LOT of time. I'm basically smearing gobs of silicone in between the slate and then setting the pebbles one by one to make sure they're really stuck down well.

Martin - We're a Vasquez loving family. :love: No Zim yet, haven't found a critter erratic enough to fit the name. *laughs*
 

RavaLock

New member
Joined
May 12, 2011
Messages
16
Reaction score
0
I love the idea! I have a 75g that I'm thinking of converting into a new axie tank so I'm looking for inspiration.

I have a question though. How easy is that to clean? Would there be concern for air pockets or bad bacteria growing? If not, I'm so in!

It seems like a great idea to help keep plants rooted too since the substrate wouldn't be dug up. Could design little "pots". Although my Noel doesn't seem to bother my Anubias or dwarf hair grass too much in the 20gL.

Nice work!
 

weofui

New member
Joined
Feb 21, 2012
Messages
75
Reaction score
1
Location
Colorado
Thanks!

I have a question though. How easy is that to clean? Would there be concern for air pockets or bad bacteria growing? If not, I'm so in!

I haven't had to clean it yet, so I can't say for sure, but it shouldn't be any more difficult than siphoning sand. Air pockets should only be a concern if I haven't been as diligent as I think I've been with the silicone. If you were worried, you could always use a large paintbrush to paint a thin layer of silicone over the entire floor, then wipe off the excess.
 

rodsboys

New member
Joined
Mar 29, 2011
Messages
13
Reaction score
0
Location
Edmonton, AB Canada
Wow that looks great. Have you ever considered using a clear epoxy and coating the whole thing? I will last forever and insure that no debris will ever get caught in the cracks. It would be a simple as a mix and poor. There are tons of products on the market that are intended to be submerged and non toxic once cured.
 

RavaLock

New member
Joined
May 12, 2011
Messages
16
Reaction score
0
Thanks!


I haven't had to clean it yet, so I can't say for sure, but it shouldn't be any more difficult than siphoning sand. Air pockets should only be a concern if I haven't been as diligent as I think I've been with the silicone. If you were worried, you could always use a large paintbrush to paint a thin layer of silicone over the entire floor, then wipe off the excess.

I had been thinking of that possibility as well. It's something to play with perhaps.

Wow that looks great. Have you ever considered using a clear epoxy and coating the whole thing? I will last forever and insure that no debris will ever get caught in the cracks. It would be a simple as a mix and poor. There are tons of products on the market that are intended to be submerged and non toxic once cured.

The only issue I have with that solution is that it makes the floor flat. A self-leveling epoxy would end up encasing the bottom and if I ever wanted to pour something else in, I'd lose a lot more space. Plus it wouldn't hold plants. A bumpy surface can hold plants better.
 

weofui

New member
Joined
Feb 21, 2012
Messages
75
Reaction score
1
Location
Colorado
Wow that looks great. Have you ever considered using a clear epoxy and coating the whole thing? I will last forever and insure that no debris will ever get caught in the cracks. It would be a simple as a mix and poor. There are tons of products on the market that are intended to be submerged and non toxic once cured.


I hadn't considered it... until now, at least. :)

I do want a "rough" surface for the axies to grip, but I wouldn't have to completely submerge the smaller rocks in the epoxy - plus, I'd be ABSOLUTELY sure that none of the smaller rocks would come free.

Thanks!
 

Coldnorthtoy

New member
Joined
Sep 2, 2011
Messages
127
Reaction score
1
Location
BC, Canada
I hadn't considered it... until now, at least. :)

I do want a "rough" surface for the axies to grip, but I wouldn't have to completely submerge the smaller rocks in the epoxy - plus, I'd be ABSOLUTELY sure that none of the smaller rocks would come free.

Thanks!

This post speaks to thinning epoxy using heat, which makes it 'flow like water.' By preheating the 'floor,' and warming the container you're mixing in, you would probably be able to get the epoxy to settle just into the spaces between your jelly beans :p which would not only seal the spaces from food/junk, but also help ensure they never move, and not affect the roughness of your floor.
 

RavaLock

New member
Joined
May 12, 2011
Messages
16
Reaction score
0
This post speaks to thinning epoxy using heat, which makes it 'flow like water.' By preheating the 'floor,' and warming the container you're mixing in, you would probably be able to get the epoxy to settle just into the spaces between your jelly beans :p which would not only seal the spaces from food/junk, but also help ensure they never move, and not affect the roughness of your floor.

Oh! That's an awesome idea :) Thanks for sharing!

Personally, because of this post I decided to look into a few other ideas.

I think I've decided to "steal" Weofui's cracked slate tile idea and then use a version of Geoff's Rebuild design (full thread here) and do an epoxy/sand mix between the cracks. Kind of a sandy/rocky bottom as if it's an underwater rock cave is what I'm hoping to go for.
 

Coldnorthtoy

New member
Joined
Sep 2, 2011
Messages
127
Reaction score
1
Location
BC, Canada
Oh! That's an awesome idea :) Thanks for sharing!

Personally, because of this post I decided to look into a few other ideas.

I think I've decided to "steal" Weofui's cracked slate tile idea and then use a version of Geoff's Rebuild design (full thread here) and do an epoxy/sand mix between the cracks. Kind of a sandy/rocky bottom as if it's an underwater rock cave is what I'm hoping to go for.

That's a great idea. I've also seen it done with silicone, but I think epoxy is a far more permanent and stable solution.

I've also been mulling over the idea of having a plastic 'floor pan' vacuum-moulded to a 'terrainy' shape/texture and then epoxying a thin layer of sand over that to create some permanent texture while minimizing weight and cleanup issues...

...But I've also been mulling over the idea of a planted tank, which is about as far opposite as you can get from that idea. So who knows. :)
 
General chit-chat
Help Users
  • No one is chatting at the moment.
  • Shane douglas:
    with axolotls would I basically have to keep buying and buying new axolotls to prevent inbred breeding which costs a lot of money??
    +1
    Unlike
  • Thorninmyside:
    Not necessarily but if you’re wanting to continue to grow your breeding capacity then yes. Breeding axolotls isn’t a cheap hobby nor is it a get rich quick scheme. It costs a lot of money and time and deditcation
    +1
    Unlike
  • stanleyc:
    @Thorninmyside, I Lauren chen
    +1
    Unlike
  • Clareclare:
    Would Chinese fire belly newts be more or less inclined towards an aquatic eft set up versus Japanese . I'm raising them and have abandoned the terrarium at about 5 months old and switched to the aquatic setups you describe. I'm wondering if I could do this as soon as they morph?
    +1
    Unlike
    Clareclare: Would Chinese fire belly newts be more or less inclined towards an aquatic eft set up versus... +1
    Top