This is the low-budget version of Mark's project ") !
!
I want to keep my Tarichas outside for part of the summer, and wanted a large, durable tank that would be safe from predators yet still admit light.
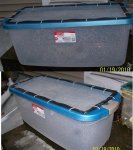
I purchased a large plastic rubbermaid container, "XL" size. The lid I used is the top for a 20 low, so you can see the "tank" is plenty large.
Picture 1. First I cut out the inside of the top. There is a large lip which I cut inside, which would make it impossible for the animals to crawl out of, even without the top.
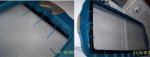
Picture 2. Next, I made holes with an awl and used zip ties to attach the lid. Unfortunately, the lid hung down inside the tank, and was too large to fit in the container. I had to start over. Oh well.
So I took that 20 gallon low lid and mashed it flat with a sledgehammer.
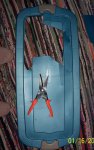
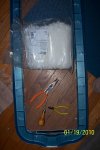
Picture 3. These are the items I used for the project, except for the sledgehammer.
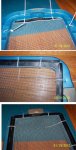
Picture 4. I poked all these holes with the awl, and used the pliers to pull the zip ties through (they didn't go through easily, they had to be pulled). These are views from the inside of the top.
Picture 5. And the finished product, view from the top. Now all I have to do is wait for spring! I'll probably make it a marshy tank and keep it in mostly shade.
!I want to keep my Tarichas outside for part of the summer, and wanted a large, durable tank that would be safe from predators yet still admit light.
I purchased a large plastic rubbermaid container, "XL" size. The lid I used is the top for a 20 low, so you can see the "tank" is plenty large.
Picture 1. First I cut out the inside of the top. There is a large lip which I cut inside, which would make it impossible for the animals to crawl out of, even without the top.
Picture 2. Next, I made holes with an awl and used zip ties to attach the lid. Unfortunately, the lid hung down inside the tank, and was too large to fit in the container. I had to start over. Oh well.
So I took that 20 gallon low lid and mashed it flat with a sledgehammer.
Picture 3. These are the items I used for the project, except for the sledgehammer.
Picture 4. I poked all these holes with the awl, and used the pliers to pull the zip ties through (they didn't go through easily, they had to be pulled). These are views from the inside of the top.
Picture 5. And the finished product, view from the top. Now all I have to do is wait for spring! I'll probably make it a marshy tank and keep it in mostly shade.