yellowpebble
New member
- Joined
- May 29, 2011
- Messages
- 917
- Reaction score
- 20
- Points
- 0
- Location
- Sydney, NSW
- Country
- Australia
- Display Name
- Rachel
I have already posted this in the axolotl section but i realised it probably should have gone here insead!
----------------
Hey,
I have had a lot of questions lately on the specifics of setting up and harvesting baby brine shrimp. There are a lot of tutorials on the internet already but they are all different and I have had varying success with each of them. This is simply the way that I find works best.
Hatching:
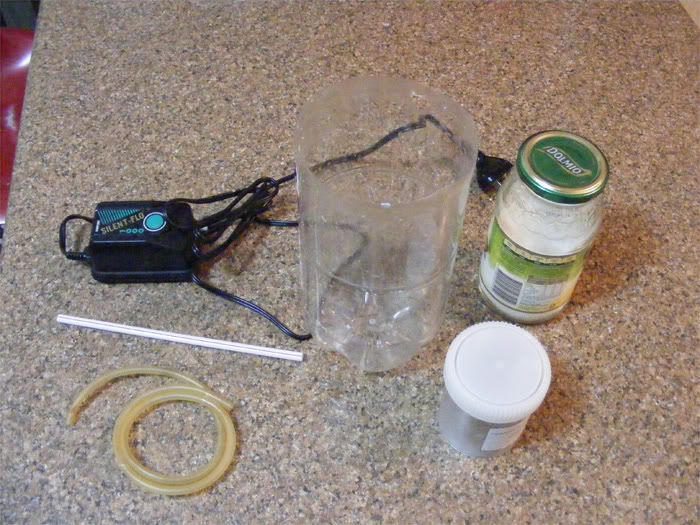
1. What you will need:
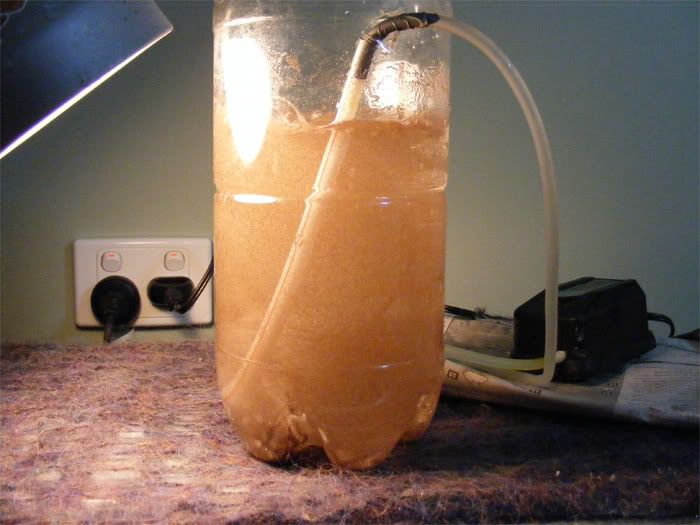
- An empty 2L plastic bottle with the top cut off, I have found round ones work best.
- An air pump
- Some airline tubing
- A straw
- Non iodised sea salt (does not have to be anything fancy like aquarium salt)
- Brine shrimp eggs (available from ebay)
- Tap water. No dechlorination necessary.
- A power point
- A lamp (optional)
2. Set up:
- Cut the top off the bottle if you haven’t already.
- Attach the straw to one end of the airline tubing. You might have to seal the straw to the tubing depending on the size of your straw, I have used electrical tape.
- Attach the other end of the tubing to the pump
- Stick the straw in the top of the bottle, so it is sitting on the bottom. I cut a small hole in the top of the bottle to put the straw through and hold it in place, but this is not necessary.
- Plug in the pump and turn it on. Air should now blow through the end of the straw into the bottom of the bottle.
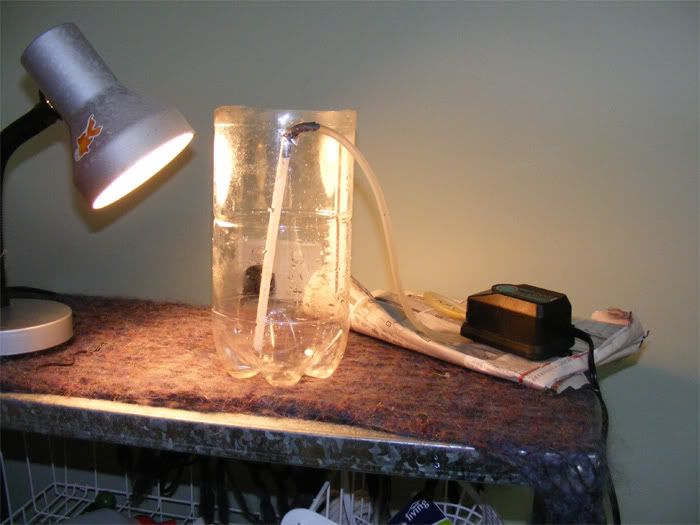
This is the basic set up for hatching the brine shrimp. Now for the brine shrimp!
3. Hatching:
- Fill the empty bottle with 2/3rds luke warm water. The warmish water will help them hatch faster.
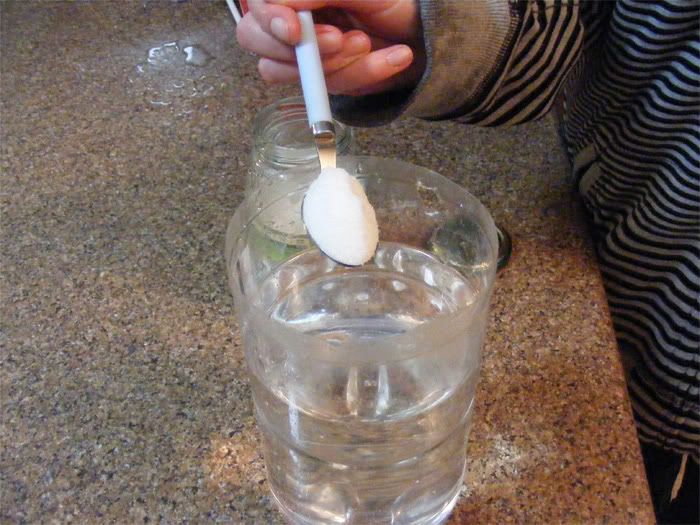
- Stir in 1 heap teaspoon of sea salt. This should make the water about as salty as a potato chip.
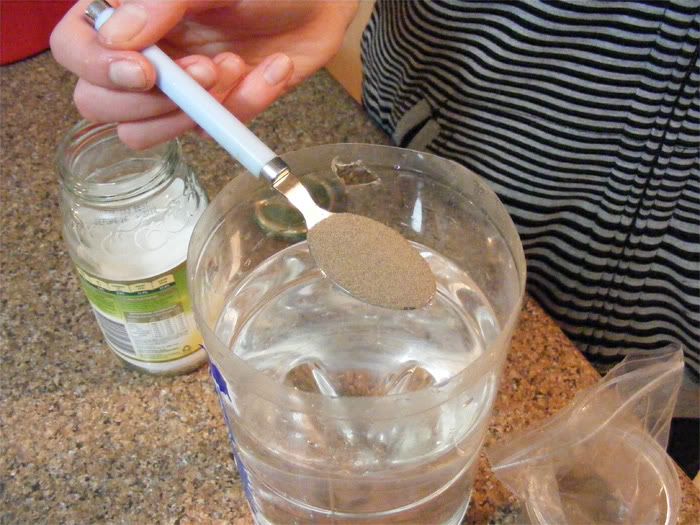
- Stir in 1 flat teaspoon of brine shrimp eggs
- Mix together and hook up to the tubing. A steady stream of bubbles should come out of the straw and the eggs should be constantly moving around.
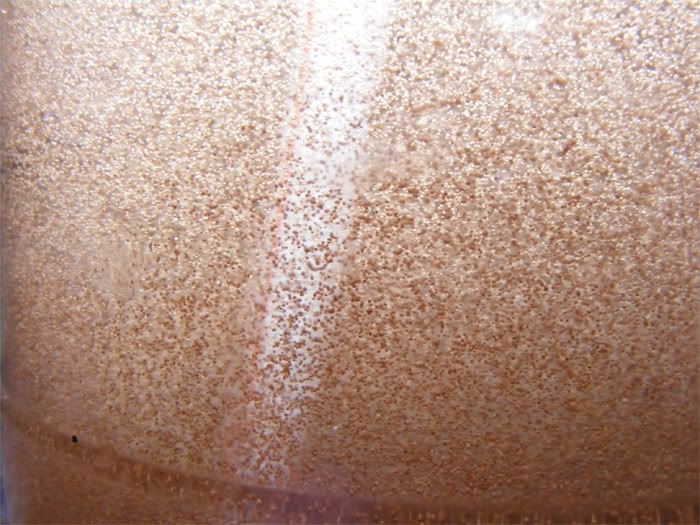
On close inspection the eggs will look like this, brown in colour.
- The hatchery needs to be left for a minimum of 24 hours in a warm, well lit spot. Ideal temperature is 25C, but it is winter here so I have put my hatchery in front of a lamp for light and heat. When using a lamp for heat, make sure you have an old fashioned filament bulb, because the energy saving fluro type do not generate heat.
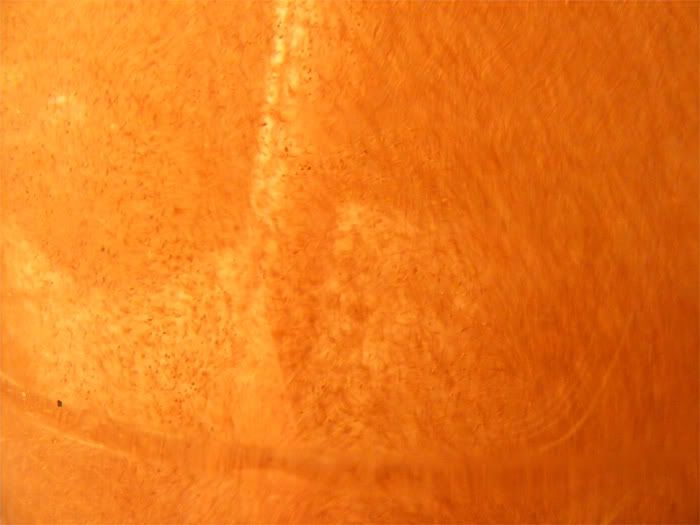
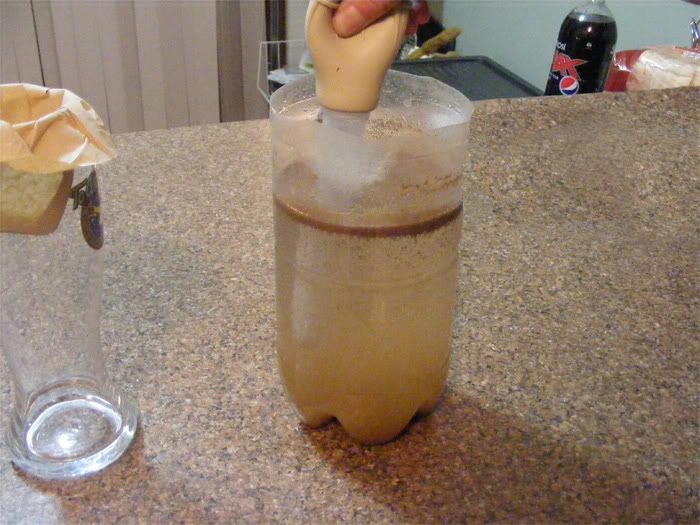
- Leave for 24 hours for the shimp to hatch. You can tell hatching has occurred because the hatchery will change colour, from brown like the image before to rusty orange brown like this:
Harvesting
1. What you will need:
- A tall glass
- A paper coffee filter
- A turkey baster
- The hatchery
- Plain tap water
2. Harvesting:
- Let the hatchery settle in a dark spot for 10 minutes. A cupboard is ideal.
- The hatchery will separate into layers, egg shells on top, water in the middle and hatched brine shrimp on the bottom. The shrimp will look like an orange wriggling mass, although I have heard their colour depends on how much salt is used.

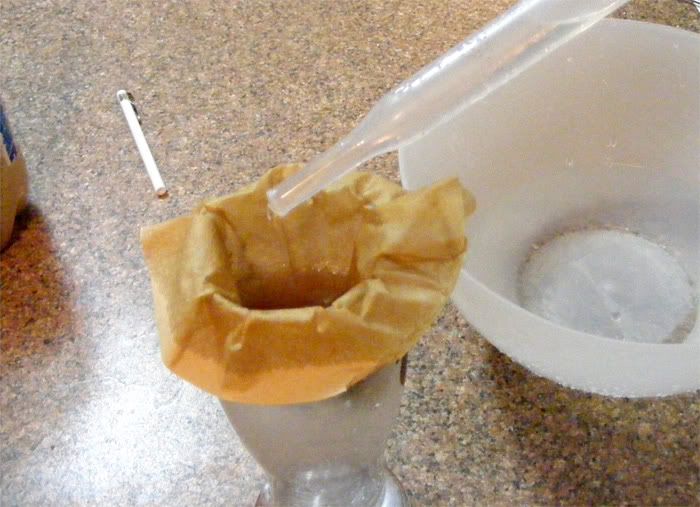
- Fold the top of the paper coffee filter over the top of the glass to hold it in place
- take the turkey baster and suck up the shrimp from the bottom of the hatchery.
- Squirt the contents in the paper filter. This will filter out the shrimp from the salt water which will pass through and be collected in the glass.
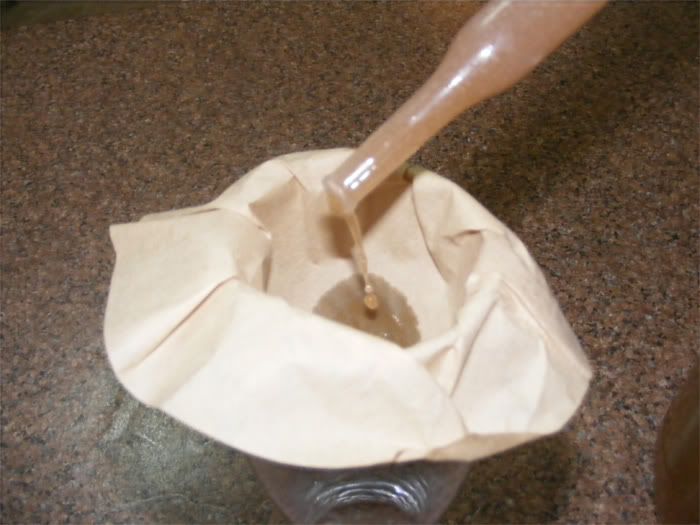
- Keep squirting in the brine shrimp (try to avoid any eggs) while the water drains out.
- You may have to pour the water out sometimes if the glass gets full. Just pick up the filter without spilling any and tip out the water. Put the brine shrimp filled filter back on the glass afterwards and continue.
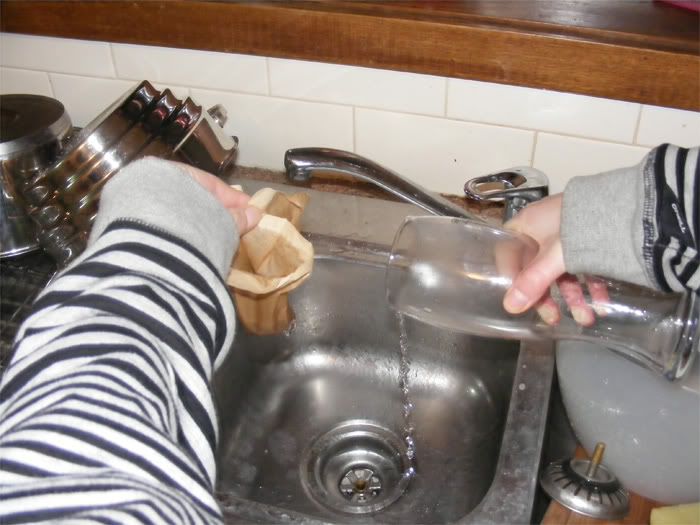
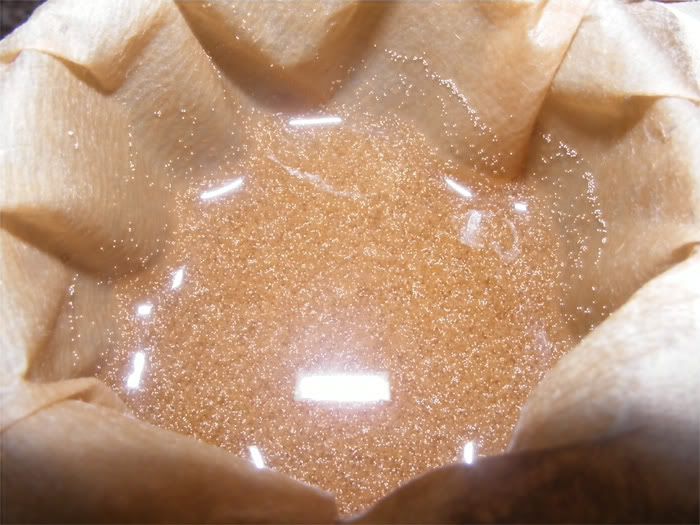
- Once you have your desired amount of brine shrimp, keep topping off the filter with plain tap water, until the brine shrimp mixture in the filter no longer tastes salty (yes you have to taste it). This might take a few basters full of water.
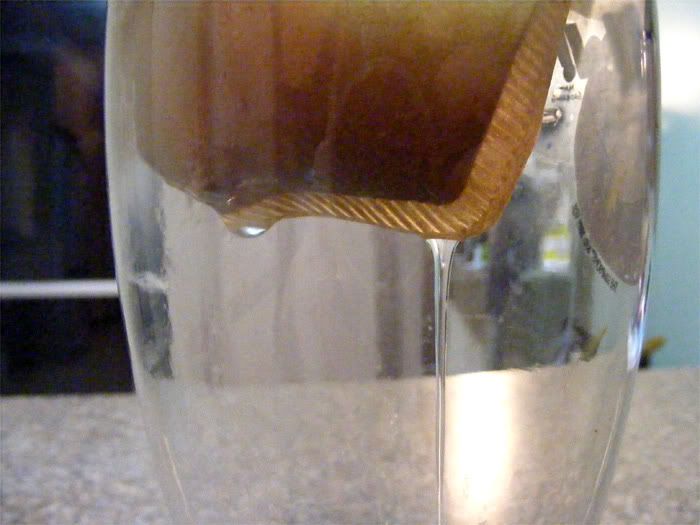
- the end product in the coffee filter should look like this:
- Suck out the brine shrimp/water mixture and feed to your hungry babies!
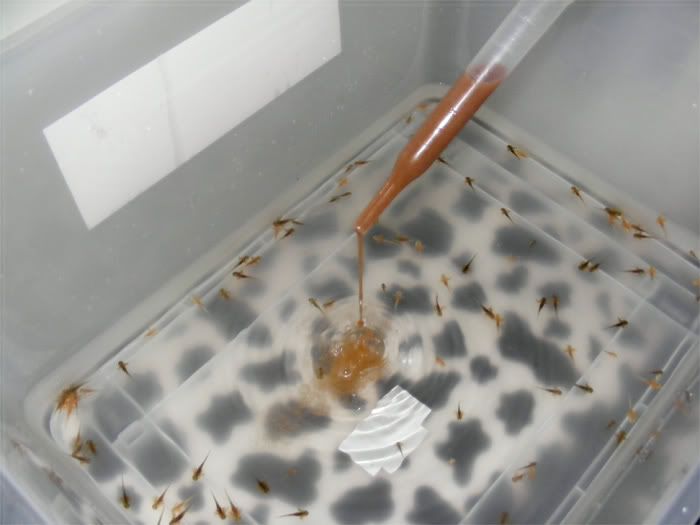
That is my process. I have so many babies I usually empty one of these containers each feeding, however it will depend on how many babies you have. One hatchery will usually only last 2 days, so it is recommended to have 2 going at once at different stages of progress so you will always have a constant supply.
Make sure you store the brine shrimp eggs in the fridge.
I do not keep my babies in sepperate containers because they have not reached the cannibalising stage yet. It has worked very well. Keeping them well fed also stops them nomming each other!
To be extra carfull you can de-salt the brine shrimp filter with aquarium water or dechlorinated water, however it is so little in the end i do not bother, and my babies have been fine.
Good luck
----------------
Hey,
I have had a lot of questions lately on the specifics of setting up and harvesting baby brine shrimp. There are a lot of tutorials on the internet already but they are all different and I have had varying success with each of them. This is simply the way that I find works best.
Hatching:
1. What you will need:
- An empty 2L plastic bottle with the top cut off, I have found round ones work best.
- An air pump
- Some airline tubing
- A straw
- Non iodised sea salt (does not have to be anything fancy like aquarium salt)
- Brine shrimp eggs (available from ebay)
- Tap water. No dechlorination necessary.
- A power point
- A lamp (optional)
2. Set up:
- Cut the top off the bottle if you haven’t already.
- Attach the straw to one end of the airline tubing. You might have to seal the straw to the tubing depending on the size of your straw, I have used electrical tape.
- Attach the other end of the tubing to the pump
- Stick the straw in the top of the bottle, so it is sitting on the bottom. I cut a small hole in the top of the bottle to put the straw through and hold it in place, but this is not necessary.
- Plug in the pump and turn it on. Air should now blow through the end of the straw into the bottom of the bottle.
This is the basic set up for hatching the brine shrimp. Now for the brine shrimp!
3. Hatching:
- Fill the empty bottle with 2/3rds luke warm water. The warmish water will help them hatch faster.
- Stir in 1 heap teaspoon of sea salt. This should make the water about as salty as a potato chip.
- Stir in 1 flat teaspoon of brine shrimp eggs
- Mix together and hook up to the tubing. A steady stream of bubbles should come out of the straw and the eggs should be constantly moving around.
On close inspection the eggs will look like this, brown in colour.
- The hatchery needs to be left for a minimum of 24 hours in a warm, well lit spot. Ideal temperature is 25C, but it is winter here so I have put my hatchery in front of a lamp for light and heat. When using a lamp for heat, make sure you have an old fashioned filament bulb, because the energy saving fluro type do not generate heat.
- Leave for 24 hours for the shimp to hatch. You can tell hatching has occurred because the hatchery will change colour, from brown like the image before to rusty orange brown like this:
Harvesting
1. What you will need:
- A tall glass
- A paper coffee filter
- A turkey baster
- The hatchery
- Plain tap water
2. Harvesting:
- Let the hatchery settle in a dark spot for 10 minutes. A cupboard is ideal.
- The hatchery will separate into layers, egg shells on top, water in the middle and hatched brine shrimp on the bottom. The shrimp will look like an orange wriggling mass, although I have heard their colour depends on how much salt is used.
- Fold the top of the paper coffee filter over the top of the glass to hold it in place
- take the turkey baster and suck up the shrimp from the bottom of the hatchery.
- Squirt the contents in the paper filter. This will filter out the shrimp from the salt water which will pass through and be collected in the glass.
- Keep squirting in the brine shrimp (try to avoid any eggs) while the water drains out.
- You may have to pour the water out sometimes if the glass gets full. Just pick up the filter without spilling any and tip out the water. Put the brine shrimp filled filter back on the glass afterwards and continue.
- Once you have your desired amount of brine shrimp, keep topping off the filter with plain tap water, until the brine shrimp mixture in the filter no longer tastes salty (yes you have to taste it). This might take a few basters full of water.
- the end product in the coffee filter should look like this:
- Suck out the brine shrimp/water mixture and feed to your hungry babies!
That is my process. I have so many babies I usually empty one of these containers each feeding, however it will depend on how many babies you have. One hatchery will usually only last 2 days, so it is recommended to have 2 going at once at different stages of progress so you will always have a constant supply.
Make sure you store the brine shrimp eggs in the fridge.
I do not keep my babies in sepperate containers because they have not reached the cannibalising stage yet. It has worked very well. Keeping them well fed also stops them nomming each other!
To be extra carfull you can de-salt the brine shrimp filter with aquarium water or dechlorinated water, however it is so little in the end i do not bother, and my babies have been fine.
Good luck
 So i stuck with the corner catching method
 Axolotl Enthusiast