- Joined
- Dec 13, 2006
- Messages
- 6,622
- Reaction score
- 136
- Points
- 63
- Location
- Wappingers Falls, NY
- Country
- United States
I usually use 5-gallon tanks for egg rearing tanks, but I keep breaking them, or in the case of kritter keepers (which are plenty expensive), cracking them. I wanted a cheap, durable, and while I'm at it, stackable, egg/small tank. So Here's what I did.
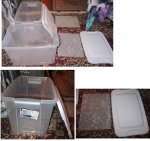
I got cheap Rubbermaid-type containers and fixed the lids up.
Picture 1: Two clear 30 Quart Sterilite containers with lids (I like that type of snap-on), and two pieces of plastic Cross-stitch canvas. You can get those in craft stores for around a dollar, or if your mother's a hoarder, free from her basement. The containers were $7.99 each at Target.
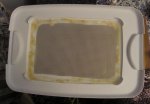
Picture 2: Cut a hole in the lid and cut the cross-stitch canvas to fit. I am making two at once, so I'm doing this all twice. The inside of the lid has little corners, so make sure the plastic will fit in there snugly.
Attaching the cross stitch canvas: I am trying two methods. One is more work but is done faster, the other is less work, but you have to wait for it to dry.
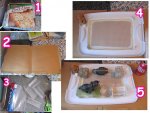
Method one: Picture 3: gluing.
1. I forgot to say, before you start this project, you have to eat a frozen pizza,
2. because you need that piece of paperboard to glue on, so you don't mess up your dining room table.
3. Also cut some pieces of wax paper to put under your paperweights, so you don't get glue on them.
4. Lay the plastic cross-stitch canvas where you want to glue it, and squirt glue all over the edges.
5. Then put the paperweights down to hold it all in place until it dries.
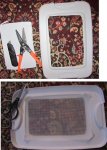
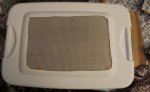
Method two: Picture 4: sewing.
1. Poke holes around the edge with an awl where you want to sew.
3. You will need a needle, scissor, and fishing line for this part.
2. Sew it all like this.
4. Done! I made my stitches about an inch apart.
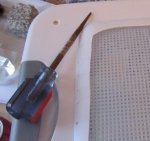
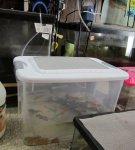
Picture 5. Don't forget to poke a hole for the airline tubing
and
Picture 6: Just add eggs!
The sewing method takes a little longer, but that egg tank is already in use, while the other one's lid is still drying.
I got cheap Rubbermaid-type containers and fixed the lids up.
Picture 1: Two clear 30 Quart Sterilite containers with lids (I like that type of snap-on), and two pieces of plastic Cross-stitch canvas. You can get those in craft stores for around a dollar, or if your mother's a hoarder, free from her basement. The containers were $7.99 each at Target.
Picture 2: Cut a hole in the lid and cut the cross-stitch canvas to fit. I am making two at once, so I'm doing this all twice. The inside of the lid has little corners, so make sure the plastic will fit in there snugly.
Attaching the cross stitch canvas: I am trying two methods. One is more work but is done faster, the other is less work, but you have to wait for it to dry.
Method one: Picture 3: gluing.
1. I forgot to say, before you start this project, you have to eat a frozen pizza,
2. because you need that piece of paperboard to glue on, so you don't mess up your dining room table.
3. Also cut some pieces of wax paper to put under your paperweights, so you don't get glue on them.
4. Lay the plastic cross-stitch canvas where you want to glue it, and squirt glue all over the edges.
5. Then put the paperweights down to hold it all in place until it dries.
Method two: Picture 4: sewing.
1. Poke holes around the edge with an awl where you want to sew.
3. You will need a needle, scissor, and fishing line for this part.
2. Sew it all like this.
4. Done! I made my stitches about an inch apart.
Picture 5. Don't forget to poke a hole for the airline tubing
and
Picture 6: Just add eggs!
The sewing method takes a little longer, but that egg tank is already in use, while the other one's lid is still drying.