Caudata.org: Newts and Salamanders Portal

Register a free account today to become a member! Once signed in, you'll be able to participate on this site by adding your own topics and posts, as well as connect with other members through your own private inbox!
Did you know that registered users see fewer ads? Register today!

New 200l tank with 3D background

evut

Active member
Joined
Apr 24, 2009
Messages
979
Reaction score
45
Location
Hertfordshire, England
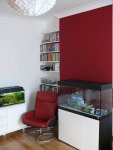
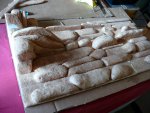
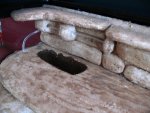
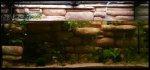
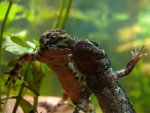
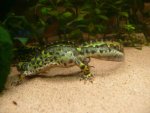
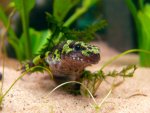
I have been busy preparing a new home for our aquatically kept T. marmoratus group and it's finally nearly ready.
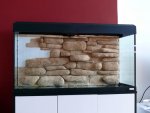
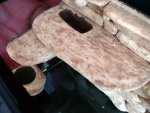
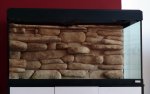
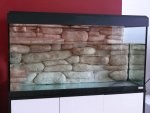
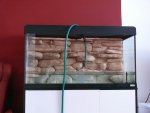
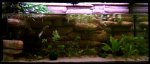
The tank is a 200 litre Fluval Roma. Here's some pictures documenting the process so far.
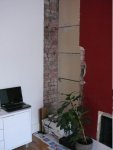
First two photos show what had to be done in the room first. A bit irrelevant from the newt point of view - just to give you an idea how complex this operation was :happy:
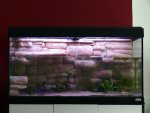
The cabinet doors were modified with sticky back vinyl to match our colour scheme.
 

Attachments

  • 110418_aquarium_002.jpg
    110418_aquarium_002.jpg
    104.9 KB · Views: 1,083
  • 110823_aquarium_002.jpg
    110823_aquarium_002.jpg
    93.9 KB · Views: 1,170

evut

Active member
Joined
Apr 24, 2009
Messages
979
Reaction score
45
Location
Hertfordshire, England
I spent a lot of time looking at other people's 3D backgrounds on the internet. In the end I decided to use the "modular" method (attaching individual fake rocks to the background one by one) and to coat everything with silicone and sand. The background had to be made in several parts to fit into the tank.
I made several "planters" and a space to hold a sponge filter.
 

Attachments

  • 110907_aquarium_001.jpg
    110907_aquarium_001.jpg
    149 KB · Views: 1,601
  • 110911_aquarium_001.jpg
    110911_aquarium_001.jpg
    185.7 KB · Views: 27,570
  • 110913_aquarium_001.jpg
    110913_aquarium_001.jpg
    208 KB · Views: 1,700

evut

Active member
Joined
Apr 24, 2009
Messages
979
Reaction score
45
Location
Hertfordshire, England
The prepared background was then siliconed into the tank in stages. The backs of the bits stuck to the side of the tank were coated and attached with black silicone. I changed the whole island area to give the newts more space and to have some flexibility with the water level. There will be a small pump underneath which will water the plant on the island (that's what the airline in the last photo is for...it hasn't been tried out so I'll have to see if it works).
 

Attachments

  • 110924_aquarium.jpg
    110924_aquarium.jpg
    120.1 KB · Views: 2,959
  • 110928_aquarium_001.jpg
    110928_aquarium_001.jpg
    189 KB · Views: 1,027
  • 110928_aquarium_002.jpg
    110928_aquarium_002.jpg
    120.3 KB · Views: 890
  • 110928_aquarium_006.jpg
    110928_aquarium_006.jpg
    114.5 KB · Views: 6,520
  • 110928_aquarium_012.jpg
    110928_aquarium_012.jpg
    195.1 KB · Views: 1,570
Last edited:

evut

Active member
Joined
Apr 24, 2009
Messages
979
Reaction score
45
Location
Hertfordshire, England
...and finally, today we filled the tank with water. My fears of all the sand falling off the polystyrene and the island breaking off haven't come true yet. Some parts look quite light in the water but generally it seems ok.
If everything's still ok tomorrow, we'll put soil and sand in, then plants and if everything's still good then also the newts.
 

Attachments

  • 110929_aquarium_006.jpg
    110929_aquarium_006.jpg
    126.2 KB · Views: 6,656
  • 110929_aquarium_008.jpg
    110929_aquarium_008.jpg
    137.8 KB · Views: 1,454

Molch

Well-known member
Joined
Sep 28, 2010
Messages
1,385
Reaction score
36
this is very impressive! I'd love to make a rock background like that for my strauchii tank.

Can you give a couple more details on how you made the rocks? They are styrofoam, right? And you used silicone to glue them to a background styrofoam sheet, which then in turn you glued to the tank?
 

evut

Active member
Joined
Apr 24, 2009
Messages
979
Reaction score
45
Location
Hertfordshire, England
Thanks, Molch.
The "rocks" are polystyrene (styrofoam)...I like to think of it as Hollywood rock :happy:
I used a Stanley knife to cut the shapes. I went through a lot of blades because they need to be super sharp to cut nicely. The pieces were coated individually with transparent silicone and sand was then pressed into it. A bit more silicone would have been better for colour (more sand would have stuck to it).
As you say, the pieces were then attached with silicone to a sheet of polystyrene which was attached to the tank, also with silicone. I used 6 tubs of the stuff for the coating and attaching - probably far too much but I was (still am) so worried about something becoming loose and floating.

This was my main inspiration: 3D Aquarium Background
Some good backgrounds can also be seen here: Cichlid-Forum :: View topic - Links to DIY backgrounds
 
Last edited:

Molch

Well-known member
Joined
Sep 28, 2010
Messages
1,385
Reaction score
36
awesome. I will attempt something similar for my strauchii, who live in a 36" tank. Very inspiring!

another stupid question: should the sand be completely dry before pressing in the silicone?

I wonder if one could even glue a few real pebbles into the wall with the fake ones?
 
Last edited:

evut

Active member
Joined
Apr 24, 2009
Messages
979
Reaction score
45
Location
Hertfordshire, England
Anything you want to attach with silicone must be really dry, otherwise it won't work. Regarding real pebbles, I think the only worry would be the weight (if they're large) but if you can attach them securely, perhaps into holes in the background, it should be possible.
 

evut

Active member
Joined
Apr 24, 2009
Messages
979
Reaction score
45
Location
Hertfordshire, England
We put in soil and sand and last night I planted the tank. I am hoping that the plants will grow well and fill the space quickly. The water feature on the island will probably be unnecessary because the planter leaks from the bottom but it might be useful if there's java moss. For now I'll just probably put in some hedera. The two other planters have bacopa in them which I hope will grow out of water (the one in the back should also hide the airline).
 

Attachments

  • 111001_aquarium_010.jpg
    111001_aquarium_010.jpg
    126.3 KB · Views: 29,226

Bellabelloo

Julia
Staff member
Joined
May 7, 2007
Messages
5,260
Reaction score
114
Location
Hatfield, England
Wow Eva, Fernando and his ladies will love this. I think the light background will be fantastic, if it was darker I feel you would get lost when all the plants grow.
 

evut

Active member
Joined
Apr 24, 2009
Messages
979
Reaction score
45
Location
Hertfordshire, England
Just a little update - I have fixed some minor issues and planted the island with tradescantia and hydrocotyle, which Chris (Froggy) kindly sent me, along with the floating limnobium.
This is what the tank looks like now. I am adding a few photos of the inhabitants as well. I assume that the water is a thick soup of newt pheromones at the moment...
 

Attachments

  • 111017_aquarium_001.jpg
    111017_aquarium_001.jpg
    118.9 KB · Views: 1,460
  • 111012_newts_006.jpg
    111012_newts_006.jpg
    161.4 KB · Views: 1,099
  • 111012_newts_008.jpg
    111012_newts_008.jpg
    123.9 KB · Views: 1,889
  • 111016_newts_009.jpg
    111016_newts_009.jpg
    113.6 KB · Views: 1,459
  • 111016_newts_010.jpg
    111016_newts_010.jpg
    134 KB · Views: 722
  • 111017_NEWTS_001.jpg
    111017_NEWTS_001.jpg
    157.6 KB · Views: 658
  • 111018_newts_005.jpg
    111018_newts_005.jpg
    97.6 KB · Views: 597
  • 111010_newts_010.jpg
    111010_newts_010.jpg
    145.3 KB · Views: 891
Last edited:

Azhael

Site Contributor
Joined
May 7, 2007
Messages
6,645
Reaction score
103
Location
Burgos
Looking great! Both the newts and the tank, although since i´m a sucker for marmoratus, specially the newts :p
Both the Tradescantia and the Hydrocotyle look awesome, and once they get going they grow very fast, i love it. Thanks to Joost and Chris, i´ve developed a rather unhealthy fixation with Hydrocotyle...it just looks great.
Good luck with those handsome newts, and post pics when the plants really go wild, it´s going to look amazing!
 

evut

Active member
Joined
Apr 24, 2009
Messages
979
Reaction score
45
Location
Hertfordshire, England
A little update:
I am quite disappointed with the plants - I thought I'd be able to watch them grow... But it's only been two months and looking at the old photo it's perhaps not so bad. The plants on the island are doing well - especially the Hydrocotyle.
There is some algae (brown and hair algae) but nothing major. I had to get rid of Bacopa monnieri from two tanks however, because of hair algae - it seems to be a magnet for it.
The worst thing is that planaria are everywhere - tiny but numerous. They seem to thrive in this set up even though I still do fairly frequent water changes and my newts don't know the meaning of the word leftovers. I suppose I'll just have to live with that.

This is what the tank looks like now:
 

Attachments

  • 111126_aquarium_005.jpg
    111126_aquarium_005.jpg
    163.2 KB · Views: 1,226

Darkan

New member
Joined
Dec 21, 2011
Messages
8
Reaction score
0
I love the tank, and the helpful how-to/links. Thanks a bunch!
 

evut

Active member
Joined
Apr 24, 2009
Messages
979
Reaction score
45
Location
Hertfordshire, England
I don't clean the background. There is a bit of algae around the filter outlet and on the edges of the islands, otherwise it looks like new. It can be rubbed off but I think some of the sand might come off if it was scrubbed too hard or too often. It's a kind of natural set up, with soil, lots of microfauna...I'm just leaving it be most of the time :happy:
 

zoezakella

Member
Joined
Aug 9, 2010
Messages
993
Reaction score
22
Location
Thame
Eva thats amazing what a fantastic idea!! Your newts look very happy in their and glad you finally got to use your new tank, looks better now than sat on the kitchen table in its box :D
 

mr cyclone

Active member
Joined
Mar 14, 2010
Messages
570
Reaction score
38
Location
Edinburgh Scotland
I don't clean the background. There is a bit of algae around the filter outlet and on the edges of the islands, otherwise it looks like new. It can be rubbed off but I think some of the sand might come off if it was scrubbed too hard or too often. It's a kind of natural set up, with soil, lots of microfauna...I'm just leaving it be most of the time :happy:

Are you not worried about the build up of bacteria or anything? ,it's quite inspiring might give it a go myself
 

KingCam

New member
Joined
Feb 22, 2012
Messages
191
Reaction score
9
Location
NW Missouri
WOW! Your tank is incredible, and its inhabitants are even better! Gorgeous animals you have there :D
 
General chit-chat
Help Users
  • No one is chatting at the moment.
    There are no messages in the chat. Be the first one to say Hi!
    Top